How to integrate Brevo Live Chat into a Nuxt 3 app

Fabian Beer
Published — Last updated
If you are using Brevo as a Marketing tool, you may have stumbled on the Live Chat feature. Which I think is great if you want to get directly in touch with your customers. Also, it's already built into Brevo and works well with all of the other features. However, I did not find a Vue or Nuxt integration of it. So here is how you can easily integrate it into your Nuxt App or Website.

Create your Nuxt project
You can of course skip this step if you already have a project setuped and running. If not, I suggest you to hop over to the Installation-section of the Nuxt docs.
Setup a free Brevo account and obtain your BrevoConversationsID
If you haven't already, create a free Brevo account.
After that, log into your Dashboard, in the left sidebar click Conversations , then Settings and Chat Widget.
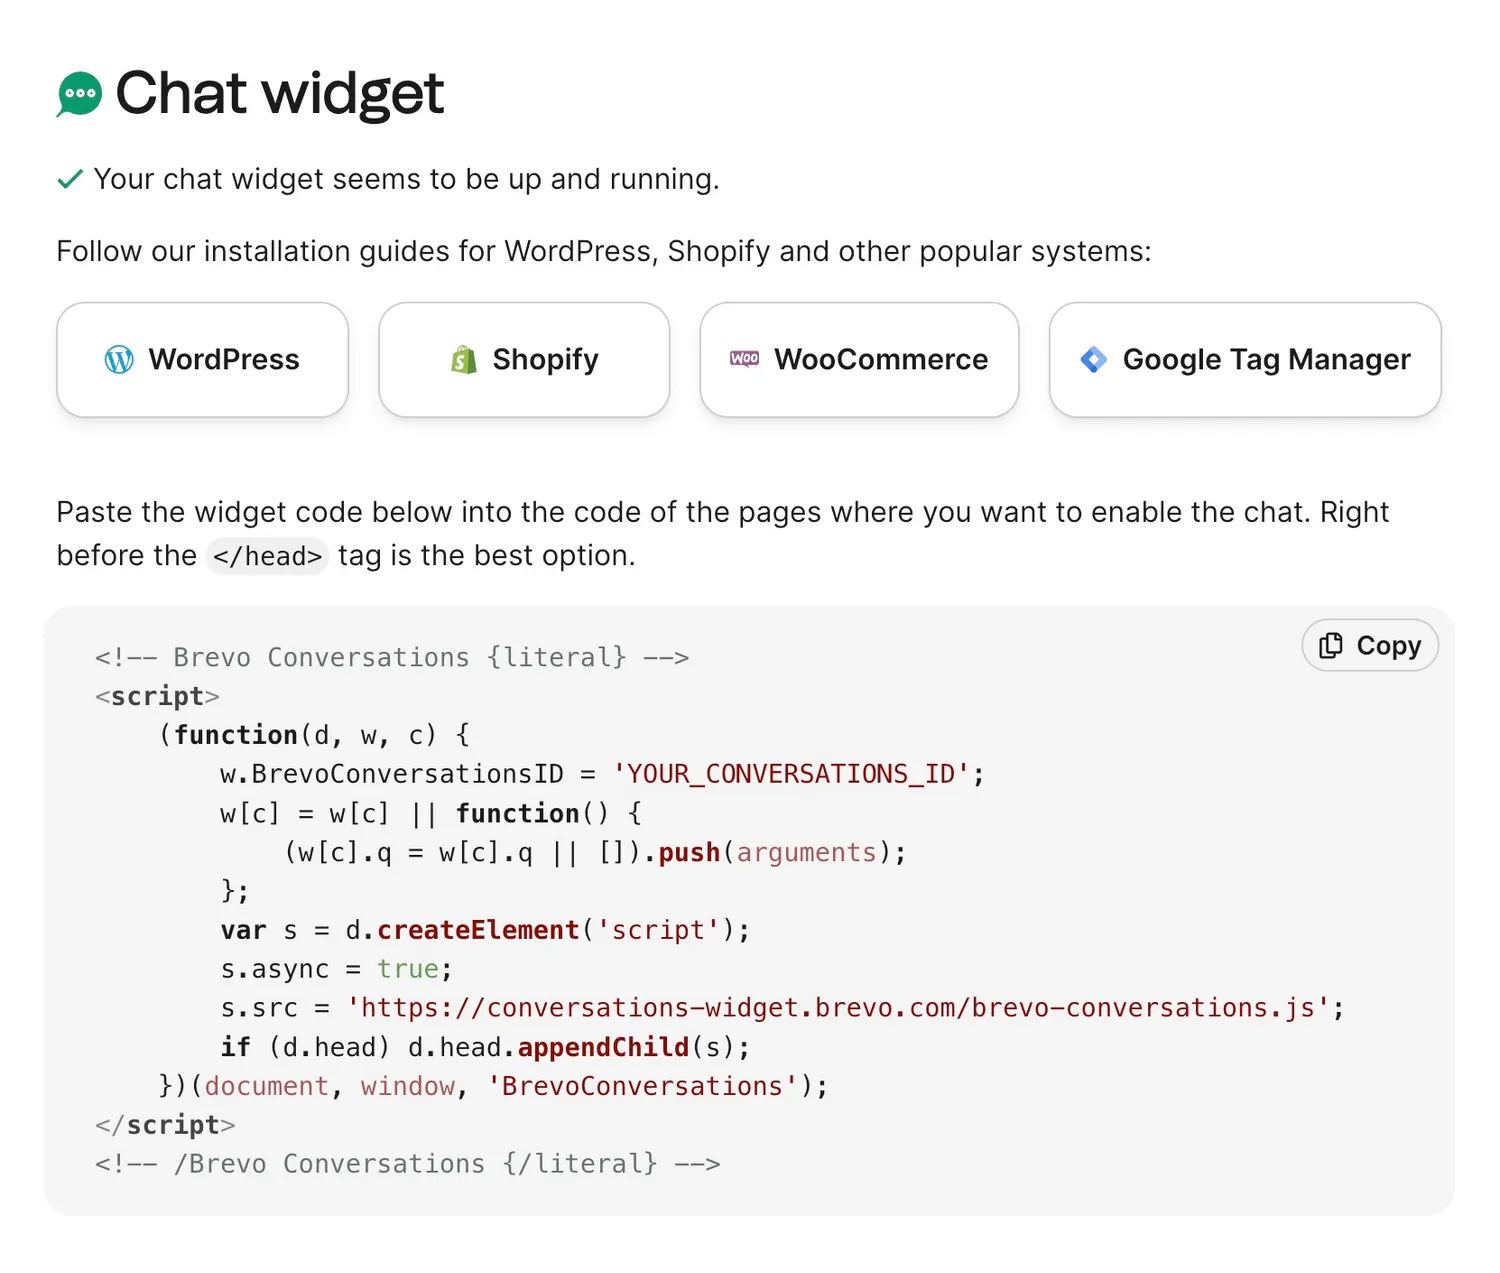
From here on, you can setup your chat widgets settings, things like the color, position and so on. At the end, you will get the setup instructions, which should look something like this: (when you set it up the first time, it can look a bit different. Check out the Brevo Documentation for more details)

You see the
w.BrevoConversationsID =
line in there. We need this for the next steps, be sure to copy it or keep
these instructions open.
Create a new Vue Composable
Back to code! To keep your integration of Brevo reusable throughout your app, you can create a Vue composable which handles all the required code for you.
For Nuxt 3, create a new file inside the
composables
folder (create it if you don't have it already) named
useBrevoWidget.ts
or any name you like:
declare global {
	interface Window {
		BrevoConversationsID: string
		BrevoConversations: any
	}
}

export const useBrevoWidget = () => {
	// Load widget on mount
	onMounted(() => {
		const script = document.createElement('script')
		script.async = true
		script.src = 'https://conversations-widget.brevo.com/brevo-conversations.js'
		window.BrevoConversationsID = 'YOUR_CONVERSATIONS_ID'

		script.onload = () => {
			window.BrevoConversations =
				window.BrevoConversations ||
				function () {
					;(window.BrevoConversations.q = window.BrevoConversations.q || []).push(arguments)
				}
		}

		if (document.head) {
			document.head.appendChild(script)
		}
	})

	// Destroy widget on unmount
	onBeforeUnmount(() => {
		window?.BrevoConversations('kill', true)
	})

	const openChat = () => {
		window?.BrevoConversations('openChat', true)
	}

	return { openChat }
}
This code does the following things
-
(TypeScript only) Registering the global
BrevoConversationsIDvariable andBrevoConversationsmethod as types intoWindowto avoid type errors. -
When the component or page where you will use this new composable mounts (client-side), it loads the script necessary to load the Brevo widget. Replace
YOUR_CONVERSATIONS_IDwith the one you obtained from the Brevo dashboard in the last step. You can also use environment variables like which are explained in the Nuxt Runtime Config Docs. -
Before the component or page the widget is used in gets unmounted, it destroys the widget. This makes it possible to use the widget only in some cases (conditionally) or only in some selected pages.
-
It defines a
openChatmethod, which you can use to open the chat window programmatically, allowing you to create custom Contact us buttons in your app, which will trigger to visually open the widget for a user.
You are free to add methods or functionality into this composable, but for now includes everything to get you up and running. Head over to the Customization Docs and Widget JavaScript API Reference to learn how to customize it further and extend the functionality of your composable.
Use your new composable 🎉
You can now use this composable everywhere in your app or website. Since Nuxt
auto-imports everything, you can just use it like this, for example in
pages/contact-us.vue:
<template>
	<h1>Contact us</h1>
	<p>Click on the chat bubble</p>
</template>

<script setup lang="ts">
	useBrevoWidget()
</script>
You see that now, as soon as you navigate to the page where you used that composable, the little sticky chat bubble button pops up (in the color, icon style and position you defined in the dashboard).
If you want to use the openChat method to programmatically open the chat widget for the user, you can do something like this:
<template>
	<h1>Contact us</h1>
	<p>Click on the chat bubble or click this button</p>
	<button @click="openChat">Open chat</button>
</template>

<script setup lang="ts">
	const { openChat } = useBrevoWidget()
</script>
When you click your
<button>, it will open the chat directly. How cool is that!
